> ## Documentation Index
> Fetch the complete documentation index at: https://docs.topsort.com/llms.txt
> Use this file to discover all available pages before exploring further.

# Frequency Cap

> How frequency cap works

export const LastUpdated = ({date, lang = "en"}) => {
  const translations = {
    en: "Last updated:",
    es: "Última actualización:",
    pt: "Última atualização:",
    fr: "Dernière mise à jour:",
    de: "Zuletzt aktualisiert:"
  };
  const label = translations[lang] || translations.en;
  return <>
<style>{`
.last-updated-component {
display: inline-flex;
align-items: center;
gap: 8px;
padding: 10px 16px;
border-radius: 8px;
margin-top: 12px;
margin-bottom: 16px;
font-size: 14px;
background-color: rgba(0, 0, 0, 0.05);
border: 1px solid rgba(0, 0, 0, 0.12);
color: rgba(0, 0, 0, 0.75);
line-height: 1;
}

        .last-updated-component svg {
          flex-shrink: 0;
          vertical-align: middle;
        }

        .last-updated-component span {
          display: inline-flex !important;
          align-items: center !important;
          line-height: 1 !important;
        }

        [data-theme="dark"] .last-updated-component {
          background-color: #3a3a3a;
          border: 2px solid #888888;
          color: #ffffff;
        }

        [data-theme="dark"] .last-updated-component svg {
          stroke: #ffffff;
        }
      `}</style>
      <div className="last-updated-component">
        <svg width="16" height="16" viewBox="0 0 24 24" fill="none" stroke="currentColor" strokeWidth="2" strokeLinecap="round" strokeLinejoin="round">
          <circle cx="12" cy="12" r="10" />
          <polyline points="12 6 12 12 16 14" />
        </svg>
        <span>
          <strong style={{
    fontWeight: 600
  }}>{label}</strong> 
          <time dateTime={date}>{date}</time>
        </span>
      </div>
    </>;
};

<div style={{textAlign: 'justify', marginBottom: '1.5rem'}}>
  Frequency Cap allows advertisers to control how many times a single user sees the same ad. It creates a less annoying experience for users by preventing them from seeing the same ad multiple times, which also helps ads perform better as they avoid overexposure. The feature also ensures that the budget is used more efficiently and helps distribute ad impressions more evenly across the audience.
</div>

## How It Works

<Steps>
  <Step title="Campaign Setup">
    <div style={{textAlign: 'justify', marginBottom: '1.5rem'}}>
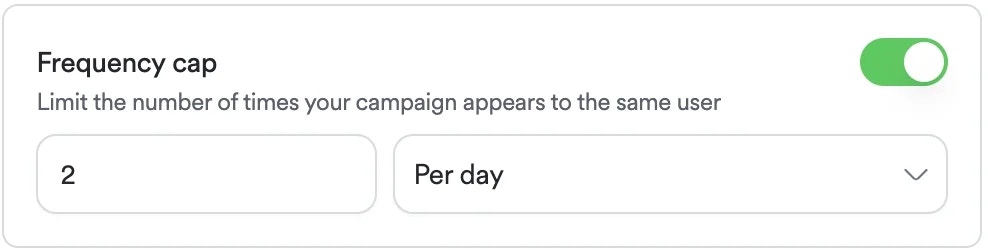
      On campaign creation, enable "Frequency cap” and set how many times a user can see the ad within a specific time (per day or per week). The system tracks views for each user, and when a user reaches the limit in that time period, the system stops showing them that ad until the time period ends.
    </div>

    <div style={{textAlign: 'justify', marginBottom: '1.5rem'}}>
      **<Frame>      <img src="https://mintcdn.com/topsort/FVdFH6-GAInpFZWG/images/knowledge-base/ad-platform-campaign-targeting-frequency-cap.webp?fit=max&auto=format&n=FVdFH6-GAInpFZWG&q=85&s=b49023c6a3bbdfec589d433a5dcb8396" alt="Screenshot showing for frequency cap functionality." width="988" height="250" data-path="images/knowledge-base/ad-platform-campaign-targeting-frequency-cap.webp" /></Frame>**
    </div>
  </Step>

  <Step title="Auction Process">
    <div style={{textAlign: 'justify', marginBottom: '1.5rem'}}>
      This feature requires the client to send the user's `opaqueUserId` in the ad requests. The following auction request can be used.
    </div>

    ```json theme={null}
    {
      "auctions": [
        {
          "type": "banners",
          "slots": 1,
          "slotId": "homepage_banner",
          "device": "mobile",
          "opaqueUserId":"0000488787_0681bb44-8553-41f3-a912-ca526afab323"
        }
      ]
    }
    ```
  </Step>
</Steps>

***

<LastUpdated date="2025-11-18" />
